
- Details
- Hits: 251

This button allows when modifying the schedule to see the effect of this change on the project's end date or a specific task date without having to go look at that task.
It allows you to choose which task you want to follow if you want to follow an intermediate task.
When you click the following window appears:

You can select the end date of the project or follow the date of a particular task with the drop-down menu.

This is a toggle button, when you click it, it activates end date tracking and when you click again it stops following the end date.
You will be able to see if the Track End date is activated in the Status Bar, at the bottom of the Software window:

- Details
- Hits: 243

It allows you to quickly reach an activity if you select its unique number.
When you click on the button, the following window is displayed:

In Project every new task is assigned a unique ID that will never be used again, you may use this number to find a specific activity.

- Details
- Hits: 243
The buttons in this group will allow you to use different ways to analyze a schedule more easily.
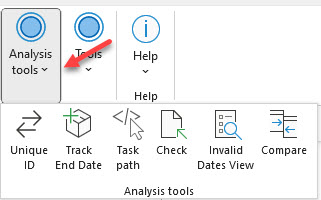
The Unique ID button  allows you to quickly access a task using its unique number.
The Track End date button  allows you to see the delays or acceleration on a schedule of a specific task when there are changes in durations on a task's path.
The Task Path button  allows you to see, depending on your selection, the predecessors, successors as well as those driving predecessor and driven successor of the selected task.
The Check Schedule button  makes it easy to see if your schedule is technically compliant.
The Invalid Dates View  help find Invalid dates in context on the update schedule in fonction on the Status date
The Compare Schedule button  lets you compare two schedules for the same project according to their progress.
- Details
- Hits: 249

This button allows you to cancel an update if you decide not to complete it.
It will erase all the files that were created to save the update.
If you try to abort an update without using this button, the Construction add-in will prevent you from switching views.

- Details
- Hits: 241

When you have finished entering all data for the update click this button to save it.
The following window will appear to check:

If you answer Yes, the add-in will save the update file in status date and re-save the content into your original follow-up file.
If you answer No, you will return to the Update view and you can complete your update.
")
")