
- Details
- Hits: 228
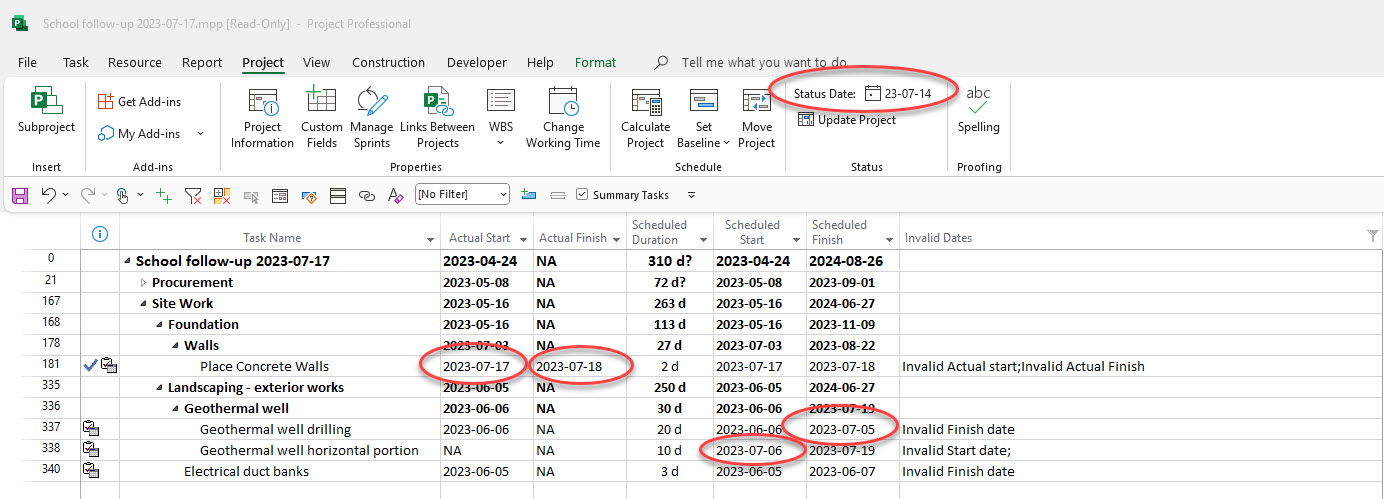
This button  will change to a view that will help you find more quickly the dates wich are invalid in fonction of the status date.
- Details
- Hits: 391
1 - Could not be installed
WARNINGS:
IF YOUR DOCUMENTS OR OFFICE DIRECTORY IS SYNCHRONIZED ON ONEDRIVE, YOU WILL NOT BE ABLE TO INSTALL THE CONSTRUCTION Addin © .
- Copy it to the root directory (c: \ of the hard drive of the computer)
- Do the Installation the Construction Addin ©
2 - Authorization problem - certificate not trusted

To correct the problem, you will need:
- Go to file explorer
- Right click on the addin setup.exe file
- Choose property

- In the Properties window of: setup.exe
- Click on the digital signatures tab
- Select Destop-Sh... then click on details

- In the Digital signature details window, click on View certificate

- In the Certificate window; Click on Install a certificate and Click on OK

- In the Certificate Import Wizard window; Click on Current user Then on Next

- In the Certificate Store window; Click on the Place all certificates in the following store radio button
Click on the Browse button
Select Trusted Root Certification Authories
Click on OK
Click on Next

- On the next window click on Finish

- Then Ok several times to return to the file explorer.
- Install the Construction add-in
- Details
- Hits: 580
1- Close Ms Project if it is open.
2- You have downloaded a zipped Construction .zip file that will need to be unzipped on your computer. (Do not install it on the server or from the email).
3- First go to uninstall the previous Construction add-in program using the control panel.


4- Then proceed with the installation of the Construction Addin ©
- Details
- Hits: 447
1- Close Ms Project if it is open.
2- You have downloaded a Construction.zip file which will need to be unzipped on your computer. (Do not install it on the server or from the email).
3- Click on the setup.exe file in the directory.

4- When the following window appears, please click on Install.

5- At the end of the installation, this window will appear to tell you that the installation was done correctly. Close the window.

6. When you open Ms Project (Plan 3), you will have in Project tabs an additional tab called Construction.

7. To access online help; Click on the drop-down menu of the Help button and Click on Help 
- Details
- Hits: 392
With the Construction add-in, we have made it easier for you to Update the project using the tool within the Update Schedule Group.
We recommend doing this at a minimum weekly to reduce the time spent doing it.
On the Construction tab, in the Update group, use the Record Progress button  .
.
In the view you can easily do the Update because the table used looks the same as your Site Report.
Enter data in the field Started on and Terminated on (actual start and actual finish) of each necessary tasks

Enter the Projected start and end dates in the Expected Start and Expected Finish fields.

When you are finished, please save the file with the Save Update button  .
.
The Construction Add-in will create a directory and save the files with the Update date specified.


With the Construction add-in, we have made it easier for you to Update the project using the tool within the Update Schedule Group.
We recommend doing this at a minimum weekly to reduce the time spent doing it.
On the Construction tab, in the Update group, use the Record Progress button .
In the view you can easily do the Update because the table used looks the same as your Site Report.
Enter data in the field Started on and Terminated on (actual start and actual finish) of each necessary tasks
Enter the Projected start and end dates in the Expected Start and Expected Finish fields.
When you are finished, please save the file with the Save Update button .
The Construction Add-in will create a directory and save the files with the Update date specified.
")
")